Pages

Showing posts with label ink. Show all posts

Saturday, March 8, 2014

Repackaging Mint Patties

Photo

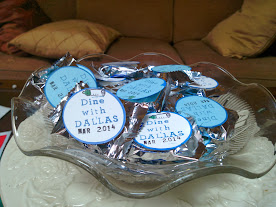
Peppermint patties and thin mints are two of my favorite treats.  To commemorate a day with friends and family, I'm adding a little splash of paper crafting to wrapped patties.

To make these, I used the Cricut Art Philosophy cartridge to quickly cut out 60 circles (settings: 1 3/4" of  on page 21) on card stock.   I stamped them with the text using blue ink then used a marker to ink the edges.

Photo

I added a stamped image of a baby bottle then used a light blue marker to color the bottle top. 

These were affixed to the peppermint patties with glue dots. It took about an hour to make 60 party favors.

This favor used a very simple shape from the Art Philosophy Cricut  Collection.  This video gives an overview of all the treats tucked inside this cartridge.

Wednesday, February 3, 2010

My Poker Face

To make enough cards to meet the monthly card swap requirements, I grabbed a box of left over decorative papers which I regularly collect from scrapbooking and card making activities. These scraps are usually pulled into mosaics or used as mats for photos.

I have several incomplete decks of playing cards. These cards would be hard to meld into one deck for a serious card game because each deck has a different design.

I pulled out a handful, wiped them down with rubbing alcohol to remove the finish, then used them as the mat for the focal image (Postmodern Design).

To make the layers stand out, I inked the edges with a marker. After gluing the first layer to the card stock, add a little depth by stamping the corners with a outline stamp (Stampin Up). The other layers are glued in place then a strip of paper covers the center of the playing card. The image is stamped and a dot of glitter glue was placed in the center.

When you click on the finished cards you get a better view of how the differing surfaces (paper, playing card) cause the image to have varying shades.

Friday, January 22, 2010

Memorial Magnet

SEI has a monthly challenge which appealed to my reduce, reuse, recycle mode of art. They encourage using the refrigerator magnets, which are often found on phone books or handed out freely by business merchants, to create something unique.

Technique: I started with an outdated business card magnet (i.e., the consultant moved to sunny Florida about two years ago). I stripped off the glossy surface then covered the magnet with a scrap from the "Enroute" paper collection (SEI). I placed glossy stickers "Christmas Mint" collection (SEI) in each corner. I used dye based ink on a rubber stamp image (Attainable Treasures) then pressed it onto beige card stock. I layered the stamped image on a green watercolor paper then adhered to the covered magnet. I stamped the text (Stampin' Up) using dye based ink onto glossy card stock. I used the Stampin' Up window punch to cut out the text in the elongated oval shape. I inked the edges of the oval and of each layer of paper used for the stamped image.

Both photographs show the magnet clinging to the exterior of the exhaust fan over the stove.

Nine days after the initial earthquake in Haiti; reports state the efforts will turn from rescue to rebuilding. Hope more assistance reaches those who have survived thus far.