Pages

Showing posts with label paper. Show all posts

Saturday, March 8, 2014

Repackaging Mint Patties

Photo

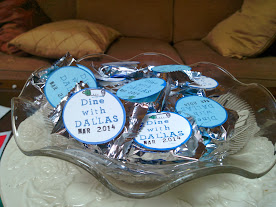
Peppermint patties and thin mints are two of my favorite treats.  To commemorate a day with friends and family, I'm adding a little splash of paper crafting to wrapped patties.

To make these, I used the Cricut Art Philosophy cartridge to quickly cut out 60 circles (settings: 1 3/4" of  on page 21) on card stock.   I stamped them with the text using blue ink then used a marker to ink the edges.

Photo

I added a stamped image of a baby bottle then used a light blue marker to color the bottle top. 

These were affixed to the peppermint patties with glue dots. It took about an hour to make 60 party favors.

This favor used a very simple shape from the Art Philosophy Cricut  Collection.  This video gives an overview of all the treats tucked inside this cartridge.

Monday, January 25, 2010

Mail Makeover

BEFORE


AFTER

Through participation in several mail art swaps, I've been introduced to different methods for reusing envelopes. Instead of starting with a brand new envelope to create a gift bag or send a letter, I re-use envelopes I receive in the mail. This approach allows me to use up scrap pieces of paper and reduce the amount of envelopes being tossed into the recycling bin.

Technqiue: To make this gift bag, you begin by re-sealing the envelope. For this one, I used a glue stick to keep the flap down. To form a gusset type sack, you will need to score 1/4 inch from the edge along the top (where the envelope flap is located) and along the bottom. Fold and make a sharp crease along the score lines to form the center fold which will be tucked into the envelope to make the gusset.

I used pages from a discarded French novel to cover a portion of the envelope. Scraps of patterned scrapbook paper cover the top. I used the Cricut - Calligraphy letters to cut Happy Birthday and the star from white glossy card stock. With Copic markers, I added color to the die cuts then glued them to the front of the envelope. The die cuts help cover places where the two papers did not meet perfectly.

Use decorative scissors to make the opening for the gift items. Add a bit of ribbon to make it more festive. To close the gift bag, I put a small amount of repositionable glue on the opening. The ribbon adds a decorative touch; however, it is not needed to close the gift bag.

Here's a link to a video which demonstrates how to create a "bagelope": http://www.youtube.com/watch?v=Oj3Q54QtLgY

Friday, January 22, 2010

Memorial Magnet

SEI has a monthly challenge which appealed to my reduce, reuse, recycle mode of art. They encourage using the refrigerator magnets, which are often found on phone books or handed out freely by business merchants, to create something unique.

Technique: I started with an outdated business card magnet (i.e., the consultant moved to sunny Florida about two years ago). I stripped off the glossy surface then covered the magnet with a scrap from the "Enroute" paper collection (SEI). I placed glossy stickers "Christmas Mint" collection (SEI) in each corner. I used dye based ink on a rubber stamp image (Attainable Treasures) then pressed it onto beige card stock. I layered the stamped image on a green watercolor paper then adhered to the covered magnet. I stamped the text (Stampin' Up) using dye based ink onto glossy card stock. I used the Stampin' Up window punch to cut out the text in the elongated oval shape. I inked the edges of the oval and of each layer of paper used for the stamped image.

Both photographs show the magnet clinging to the exterior of the exhaust fan over the stove.

Nine days after the initial earthquake in Haiti; reports state the efforts will turn from rescue to rebuilding. Hope more assistance reaches those who have survived thus far.