Pages

Showing posts with label cricut. Show all posts

Friday, March 14, 2014

Invictus


Because it's too cold to plant outdoors, I'm going to send some pansies in postcards to my friends in the  Yahoo! Postcard_xchange group.


Using the computer, I printed a poem directly onto the card stock then cut the paper - 5 1/2" x 4 1/4" for each postcard. Using the clear acrylic CTMH stamp from "My Life, Cricut Bundle" and "Love Life, Everyday Life", I put a frame around the title of the poem and added swirls along the side and bottom of the card.
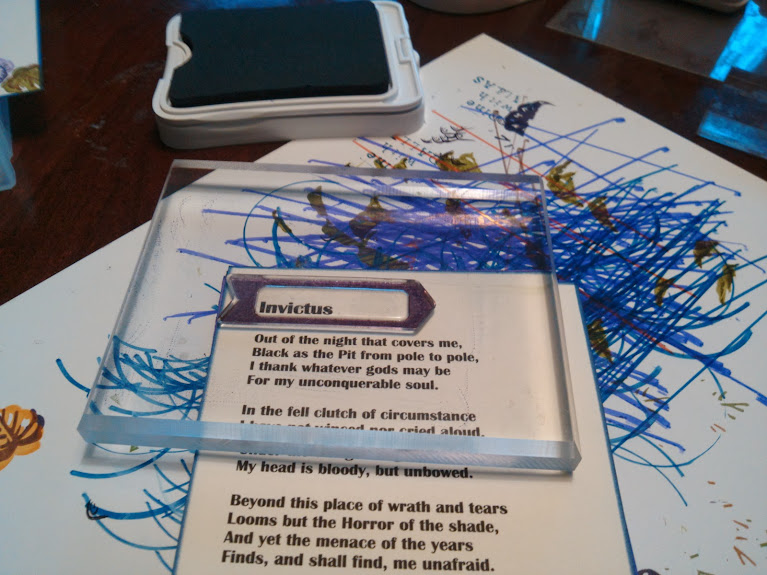
The CTMH clear acrylic stamps make it easy to add a stamped image right where you want it.

A few cards were stamped with the "Heartfelt Birthday Wish" CTMH stamp. Watch this video to see how two tones are used to highlight a stamped image. 


I stamped the pansies using two dye ink colors.  The Stamp-a -ma- jig helps with placing the second color in the correct spot when using a stamp that is not clear.
A tool helps when stamping with wood mounted stamps and creating a two-toned image.


Image has been stamped twice.
I used a marker to ink all four sides to create a border.

Ended up with 20 handmade postcards that will be mailed out as part of the March postcard exchange.

Saturday, March 8, 2014

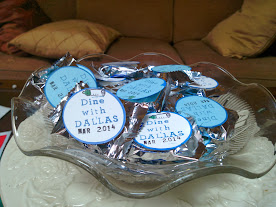
Repackaging Mint Patties

Photo

Peppermint patties and thin mints are two of my favorite treats.  To commemorate a day with friends and family, I'm adding a little splash of paper crafting to wrapped patties.

To make these, I used the Cricut Art Philosophy cartridge to quickly cut out 60 circles (settings: 1 3/4" of  on page 21) on card stock.   I stamped them with the text using blue ink then used a marker to ink the edges.

Photo

I added a stamped image of a baby bottle then used a light blue marker to color the bottle top. 

These were affixed to the peppermint patties with glue dots. It took about an hour to make 60 party favors.

This favor used a very simple shape from the Art Philosophy Cricut  Collection.  This video gives an overview of all the treats tucked inside this cartridge.

Thursday, February 20, 2014

The fox says STAMP!

February 2014 Stamp of the Month


When I drove home this evening, a red fox ran across the street in front of my car.   I braked and watched the fox skip across the snow covered lawns into the woods.  The fox sighting made me appreciate the amazing amount of wildlife in my neighborhood which sits in a major metropolitan area.  It also reminded me of the stamp set available in February for $5.00 (after a minimum purchase) through Close to My Heart.  The stamp set focuses on fox-related images and text with words of admiration.  Tomorrow, I'll post how I used the stamp set to create a quick embellishment for a card or scrapbook page.

https://cdn.closetomyheart.com/2014/image-gallery/1402-sotm.jpg  


Monday, January 25, 2010

Mail Makeover

BEFORE


AFTER

Through participation in several mail art swaps, I've been introduced to different methods for reusing envelopes. Instead of starting with a brand new envelope to create a gift bag or send a letter, I re-use envelopes I receive in the mail. This approach allows me to use up scrap pieces of paper and reduce the amount of envelopes being tossed into the recycling bin.

Technqiue: To make this gift bag, you begin by re-sealing the envelope. For this one, I used a glue stick to keep the flap down. To form a gusset type sack, you will need to score 1/4 inch from the edge along the top (where the envelope flap is located) and along the bottom. Fold and make a sharp crease along the score lines to form the center fold which will be tucked into the envelope to make the gusset.

I used pages from a discarded French novel to cover a portion of the envelope. Scraps of patterned scrapbook paper cover the top. I used the Cricut - Calligraphy letters to cut Happy Birthday and the star from white glossy card stock. With Copic markers, I added color to the die cuts then glued them to the front of the envelope. The die cuts help cover places where the two papers did not meet perfectly.

Use decorative scissors to make the opening for the gift items. Add a bit of ribbon to make it more festive. To close the gift bag, I put a small amount of repositionable glue on the opening. The ribbon adds a decorative touch; however, it is not needed to close the gift bag.

Here's a link to a video which demonstrates how to create a "bagelope": http://www.youtube.com/watch?v=Oj3Q54QtLgY