
Providing inspiration for displaying treasured memories or creating a treasure
Saturday, March 29, 2014
Homespun Yarn Party
With two of my scrap booking buddies who also dabble in yarn, I made it to my first Homespun Yarn Party on Sunday at Savage Mill in Savage, Maryland. The 30-minute wait to enter the venue prompted a walk through The Queen's Ink for paper-inspired awe. After picking up a wood-mounted stamp, I found my scrap booking friend beckoning me to join her in the Yarn Party queue because "...it's moving fast now!" We quickly made it into the party, navigated the crowd, and began interacting with the vendors and their soft, fluffy wares. So many types of hand spun, unspun, and hand-dyed yarns and fibers. It was a mini-version of the Maryland Sheep and Wool Festival without the commercial vendors, the livestock, and the carnival food.
The video shows the Yarn Party before it became crowded (i.e., the party was almost stifling at 2:30; glad they used the line to control the number of occupants).
Friday, March 28, 2014
Picture My Life
At Photo Scraps, a few scrappers asked me about the Close to My Heart albums. I use the three ring binder; it is not the soft covered spine shown in this video discussing "Picture My Life". I'll have to try get one of those before the next crop.
Thursday, March 27, 2014
Shimmer and Shine
Last weekend, I made a scrapbook page using images full of sunshine and sand. I added more sparkle by using embellishments. This video gives you a quick overview of how to use "Shimmer and Shine" to created cards and scrapbook pages that compliment your photo or text.
Wednesday, March 26, 2014
In the Background
Last weekend while attending an all day crop at Photo Scraps, I created a personalized background page by stamping an image randomly across the page. I placed the photos on the page to determine which images would be exposed, then used markers to color them.
This video explains how to use a stamped image to create a border or similar design.
This video explains how to use a stamped image to create a border or similar design.
Tuesday, March 25, 2014
Make Mine a Mini
While scrapping last weekend at Photo Scraps, I had a chance to get a close look at the numerous mini-albums on display in the store. The mini books provide great ideas for creating a mini album and for embellishing a full-size scrapbook page.
This video explains some of the many ways to use the Cricut Artbooking cartridge to make mini-albums and pages for a 12x12 album.
This video explains some of the many ways to use the Cricut Artbooking cartridge to make mini-albums and pages for a 12x12 album.
Monday, March 24, 2014
Happy!!!
I enjoyed creating scrapbook pages at Photo Scraps in Eldersburg, MD this past weekend. The store piped radio music through the overhead speakers as scrapbook participants selected photos, papers and layouts to archive memories. Two of my friends who joined in the festivities noticed the frequent replaying of "Happy" by Pharell and John Legend's "All of Me".
Here is a video featuring a Happy layout:
Here is a video featuring a Happy layout:
Sunday, March 23, 2014
Mulesing and Merino
A vegan friend of mine doesn't go to the Maryland Sheep and Wool festival. One reason is treating sheep as a commodity. Another reason is the mistreatment of sheep during the shearing process. I've watched the sheep shearing competition and to me it doesn't compare to the abuse suffered by sheep that undergo mulesing. This surgical procedure removes a crescent-shaped slice of skin from the sheep's backside and tail stump.
In Australia, Merino sheep are raised to satisfy the demand for merino wool that is used in all types of garments and sold in stores as yarn. The Merino has been bred to have more skin to produce more fleece and yield more profit. The result is wrinkled skin susceptible to "flystrike" that can produce inflammation, general systemic toxaemia, and even death. Flystrike occurs when blowfly eggs laid on the skin of the sheep hatch into larvae, which feed on the sheep’s tissue. Mulesing may prevent flystrikes; however, it may also cause infection and cannot prevent flystrikes on other parts of the sheep's body.
Five years ago, P!nk made this video about mulesing. It has disturbing images of mulesing and the eventual export of sheep to slaughter. I am now keenly focused on avoiding merino, especially if it is sourced from Australia.
This video presents one rancher's perspective. He posted the video in December 2012.
In Australia, Merino sheep are raised to satisfy the demand for merino wool that is used in all types of garments and sold in stores as yarn. The Merino has been bred to have more skin to produce more fleece and yield more profit. The result is wrinkled skin susceptible to "flystrike" that can produce inflammation, general systemic toxaemia, and even death. Flystrike occurs when blowfly eggs laid on the skin of the sheep hatch into larvae, which feed on the sheep’s tissue. Mulesing may prevent flystrikes; however, it may also cause infection and cannot prevent flystrikes on other parts of the sheep's body.
| Sheep after mulesing. |
Five years ago, P!nk made this video about mulesing. It has disturbing images of mulesing and the eventual export of sheep to slaughter. I am now keenly focused on avoiding merino, especially if it is sourced from Australia.
This video presents one rancher's perspective. He posted the video in December 2012.
Saturday, March 22, 2014
Spinning Around
As mentioned in a previous post, I have a drop spindle. I use it to make hand spun yarn infrequently. I'm considering getting a spinning wheel.
The video shows how quickly you can spin roving. Two different spinning wheels are featured.
The video shows how quickly you can spin roving. Two different spinning wheels are featured.
Friday, March 21, 2014
DIY Drop Spindle
I bought a drop spindle at the Maryland Sheep and Wool last year from a vendor who explained how to use it and sold me some pencil roving to spin. The spindle cost about $20. It is lightweight and has a really nice sheen to the wood.
If you're interested in using a drop spindle and can't find one at a local yarn shop, this video provides very detailed instructions on how to make your own drop spindle.
If you're interested in using a drop spindle and can't find one at a local yarn shop, this video provides very detailed instructions on how to make your own drop spindle.
Thursday, March 20, 2014
Combing Locks
After selecting a fleece and washing it, the next step is to comb the fleece to create a worsted roving. There are many how to videos about combing fleece locks. This video starts with placing your fleece locks into a baking pan then spritzing them with an oil and water solution; a step I had not heard of before. This is part one of the process and ends with placing the locks onto a comb. The other videos show how to complete the combing process.
Wednesday, March 19, 2014
Step 1: Pre-Wash
If you buy a fleece, it has to be processed before it can be spun. The first step is to clean it. Most videos I've seen recommended washing with a special degreasing agent or with Dawn liquid soap.
This video presents a pre-wash step - cleaning with a snow blower and a huge tumbler - that removes the vegetable matter and other debris.
This video presents a pre-wash step - cleaning with a snow blower and a huge tumbler - that removes the vegetable matter and other debris.
Tuesday, March 18, 2014
What's in the Bag?
I always see people carrying large bags of fleece at the Maryland Sheep and Wool festival.
This video describes what to look for in a fleece when buying it by the bagful.
This video describes what to look for in a fleece when buying it by the bagful.
Monday, March 17, 2014
Twist then Park
I spin using a drop spindle. Some spinners have told me a drop spindle can create yarn as fast as a spinning wheel. For me, it takes a long time. I need to perfect my movements, especially the drafting of the roving before introducing the twist.
This video shows how to use a drop spindle.
This video shows how to use a drop spindle.
Saturday, March 15, 2014
One Arm Down

Watch this video excerpt from Knitting Daily to learn about three types of steeking.
Friday, March 14, 2014
Invictus
 Because it's too cold to plant outdoors, I'm going to send some pansies in postcards to my friends in the Yahoo! Postcard_xchange group.
Using the computer, I printed a poem directly onto the card stock then cut the paper - 5 1/2" x 4 1/4" for each postcard. Using the clear acrylic CTMH stamp from "My Life, Cricut Bundle" and "Love Life, Everyday Life", I put a frame around the title of the poem and added swirls along the side and bottom of the card.
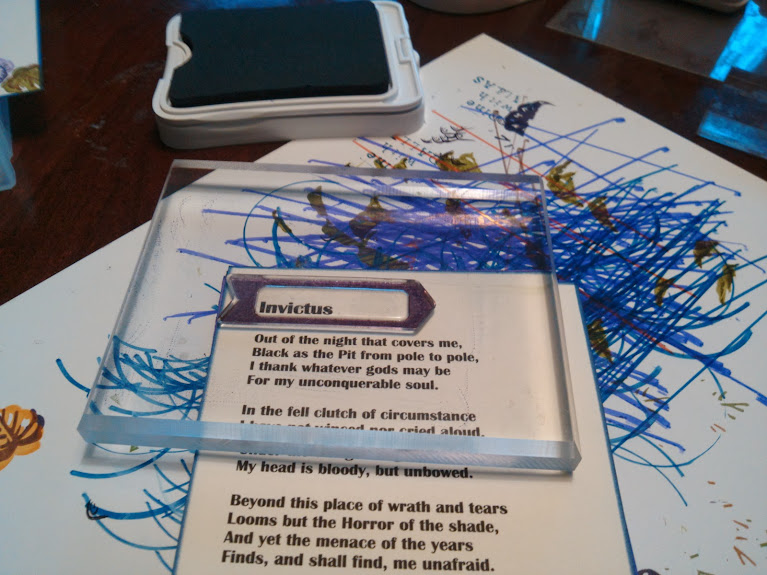 |
| The CTMH clear acrylic stamps make it easy to add a stamped image right where you want it. |
A few cards were stamped with the "Heartfelt Birthday Wish" CTMH stamp. Watch this video to see how two tones are used to highlight a stamped image.
I stamped the pansies using two dye ink colors. The Stamp-a -ma- jig helps with placing the second color in the correct spot when using a stamp that is not clear.
 | ||
| A tool helps when stamping with wood mounted stamps and creating a two-toned image. |
 |
| Image has been stamped twice. |
Ended up with 20 handmade postcards that will be mailed out as part of the March postcard exchange.
Starting with Studio J
In my quest to capture memories in an album, I'm using the Studio J to make a few layouts. I'm amazed about the flexibility in the layouts. I've always leaned more to card stock then to digital scrap booking so this is a new experience. It does go rather quickly. As with regular scrap booking, the quality of the image makes a huge impact on the final look of the layout.
The Studio savings available during March 2014 are described in this video.
The Studio savings available during March 2014 are described in this video.
Wednesday, March 12, 2014
Sweet as Tupelo Honey and Real Dial Size

This page starts with a 12 x 12 printed image. I used scissors to cut out the top portion of the image to focus on two main colors - the caramel bed covering and the white onesie. Using the Cricut Artbooking cartridge, I cut a honeycomb border (see page 66) at 7 1/2" real dial size in white card stock. Using Twilight ink, I stamped various images from CTMH - Honeycomb, Item Number: C1537, onto some of the white honeycomb pieces and glued them onto the page.
I used the Cricut Calligraphy cartridge to cut the word, Dallas, at 3" using the Real Dial Size feature on a caramel cardstock. I used the shadow feature to cut the letters again in green card stock. These were glued together and the D was covered with Liquid glass and set aside to dry before adding to the layout.

Watch this video to see more examples of how the Real Dial Size feature can be used with the Cricut Artbooking cartridge.
Sunday, March 9, 2014
Punching Plastic
Miss Sophia, my gray tabby, is an indoor cat which means we buy a lot of cat litter. The litter comes in large plastic containers. Instead of recycling, I re-purposed a few by turning them into yarn totes with a few crafting tools - a Crop A Dile and a crochet hook.
After cutting off the handle and spout, I punched holes evenly along the rim of the plastic container. I used a small crochet hook and nylon yarn by Omega to create a crochet mesh around the opening. The mesh keeps the yarn inside the container. I made a long cord using acrylic yarn to use as a closure. It is woven through the edge of the mesh.
The yarn tote addresses my primary concerns - keeping the yarn clean and untangled while still being able to pull it smoothly from a ball, cake or skein.
Here's a video in which the two different types of Crop A Diles are demonstrated and compared.
 |
| A Crop A Dile and a crocheted mesh combine to make a yarn tote. |
 |
| Even tipped over, the yarn stays inside. |
Here's a video in which the two different types of Crop A Diles are demonstrated and compared.
Saturday, March 8, 2014
Repackaging Mint Patties
Peppermint patties and thin mints are two of my favorite treats. To commemorate a day with friends and family, I'm adding a little splash of paper crafting to wrapped patties.
To make these, I used the Cricut Art Philosophy cartridge to quickly cut out 60 circles (settings: 1 3/4" of


These were affixed to the peppermint patties with glue dots. It took about an hour to make 60 party favors.
This favor used a very simple shape from the Art Philosophy Cricut Collection. This video gives an overview of all the treats tucked inside this cartridge.
Friday, March 7, 2014
Tag It!
 |
| Swatch tag for Martha Stewart Alpaca Blend yarn |
When I make a swatch for a garment, I like to mark the swatch with the information from the yarn band along with the size of needles used to make the swatch. This is helpful when returning to the same yarn to make another garment. I can quickly see the needle used to produce a specific swatch.
 Tags are a great tool for storing this information. The tags easily attach to the completed swatch and provide space for adding any other tidbits of information. I used the Cricut Art Philosophy cartridge - Tag 4 - to make the blue tag. It was cut at 3.5" from scrap card stock, rimmed with a deep blue marker then covered with information cut and punched from the yarn band.
  |
| Swatch made with MaggiKnits |
This video shows how tags can be created using the Cricut die cut machine.
Wednesday, March 5, 2014
Heart of the Rising Son
The Baltimore Sun published a story about my nephew, Sebastian, in
River Hill wrestler Ames doesn't let nerve damage limit success
I had a chance to see one of his matches at the competition for the Howard County titles. They did great job showcasing the two contenders for the title and literally putting a spotlight on each match. I've tried to upload a video from the Howard County championships and can't get it to upload, so here is a video his mother captured earlier this year.
I'm searching the internet for a rubber stamp with an image of a wrestler. If you see one, please let me know where you find it.
Tuesday, March 4, 2014
Markers are for MSW
The Maryland Sheep and Wool (MSW) Festival takes over the Howard County Fairgrounds the first full weekend of May. The past two years, I've enjoyed visiting the vendors, seeing the wide variety of fibers, thinking of possible garments to make with a uniquely dyed skein, and watching the sheep dog competition. Not all in that order and last year I did get hooked on using a drop spindle to make yarn from roving.
This year, I want to try something different and be a more active part in the festivities by entering the Skein and Garment Competition.
During the past year, I've made several top down sweaters. A few of them were steeked (i.e., knit as a tube then cut to create openings). I've also had a chance to spend time making a pair of socks and a vest using the fair isle technique (i.e., using two strands of two different yarns while knitting one row).
For my first entry, I decided to combine techniques - top down, steeking and fair isle - to create my own sweater. This approach eliminates the possibility of my sweater being the same as another knitter's.

Before committing to a design, I used my markers and grid paper to create possible color combinations and patterns. Fortunately, the colors of the markers pretty much match colors of yarn in my stash so they help give me an idea as to how hey will look in the finished garment. This doesn't negate the need to swatch before starting the sweater.
Watch the video below to see how to add color to using markers.
This year, I want to try something different and be a more active part in the festivities by entering the Skein and Garment Competition.
During the past year, I've made several top down sweaters. A few of them were steeked (i.e., knit as a tube then cut to create openings). I've also had a chance to spend time making a pair of socks and a vest using the fair isle technique (i.e., using two strands of two different yarns while knitting one row).
For my first entry, I decided to combine techniques - top down, steeking and fair isle - to create my own sweater. This approach eliminates the possibility of my sweater being the same as another knitter's.
Before committing to a design, I used my markers and grid paper to create possible color combinations and patterns. Fortunately, the colors of the markers pretty much match colors of yarn in my stash so they help give me an idea as to how hey will look in the finished garment. This doesn't negate the need to swatch before starting the sweater.
Watch the video below to see how to add color to using markers.
Saturday, March 1, 2014
March is for Matryoshkas
In March, the CTMH stamp of the month features an image of a matryoshka, a traditional Russian stacking doll. Interesting how this stamp set was chosen possibly last year; yet, it is very relevant with Russia being frequently referenced after the unexpected events in Ukraine.

The video shows how the stamp scrubber makes clean up fast and easy.
Subscribe to:
Posts (Atom)